# Use wordpress on GCP with Google Compute Engine.
# Use wordpress on GCP with Google Compute Engine.
Today we’re going to see how to install wordpress on Google Compute Engine.
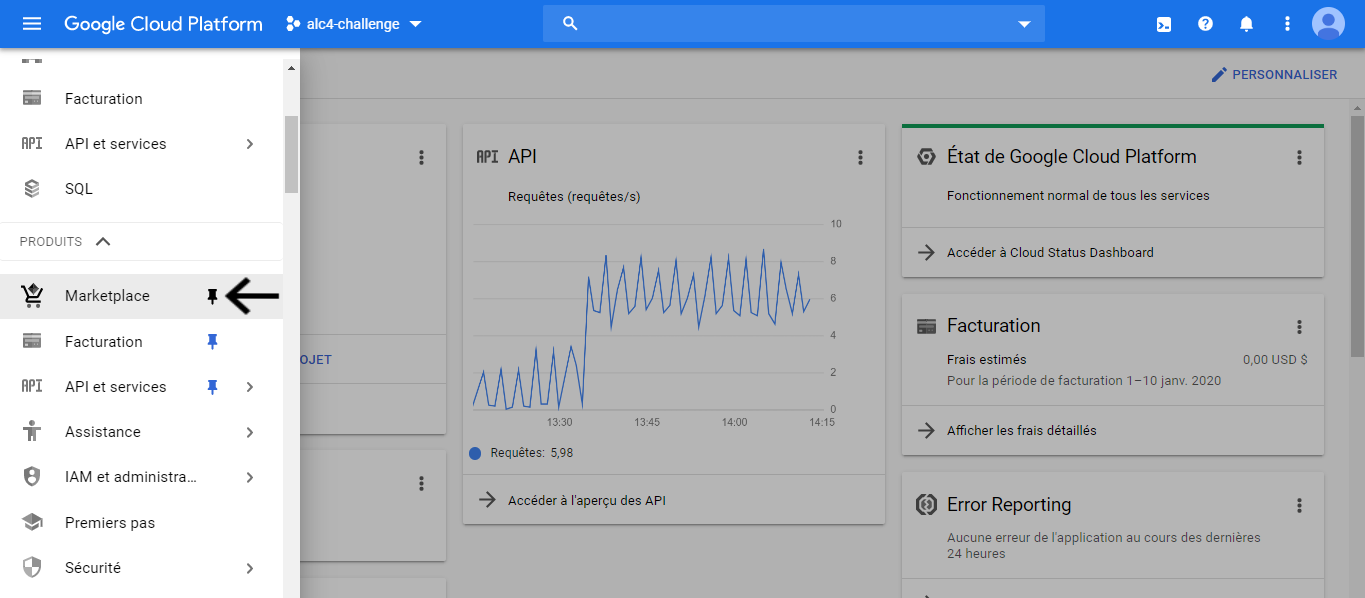
To start, we will log into the GCP console. Once done, click on **marketplace** and type wordpress in the search bar. You’ll see that there are a lot of wordpress packages.
GCP Marketplace!
GCP Marketplace — WordPress Certified by Bitnami and Automattic
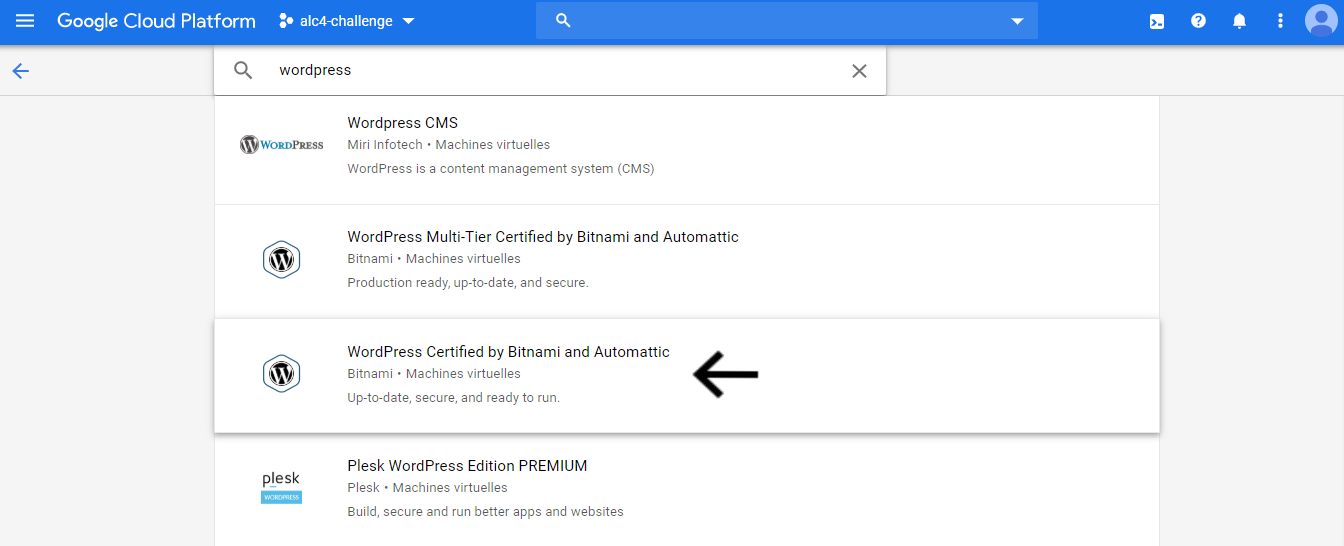
Take care to choose the one with the following name: “**WordPress Certified by Bitnami and Automattic**”.
WordPress Certified by Bitnami and Automattic
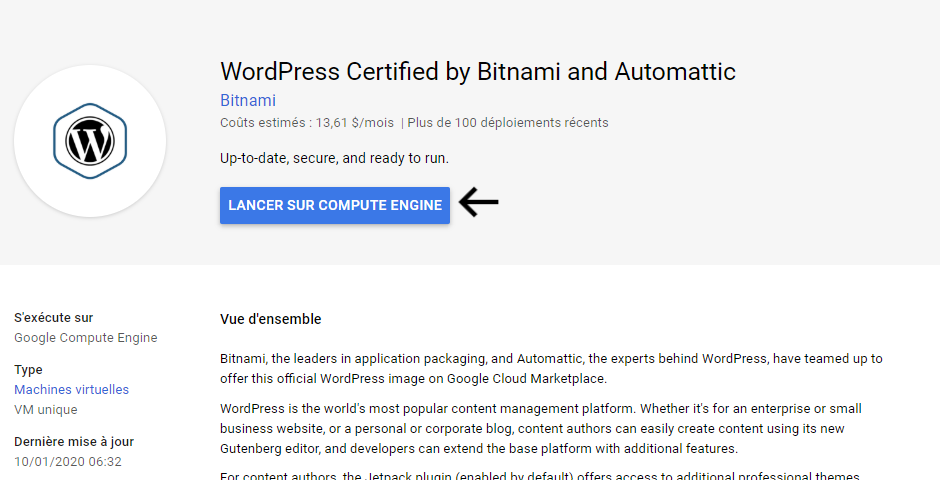
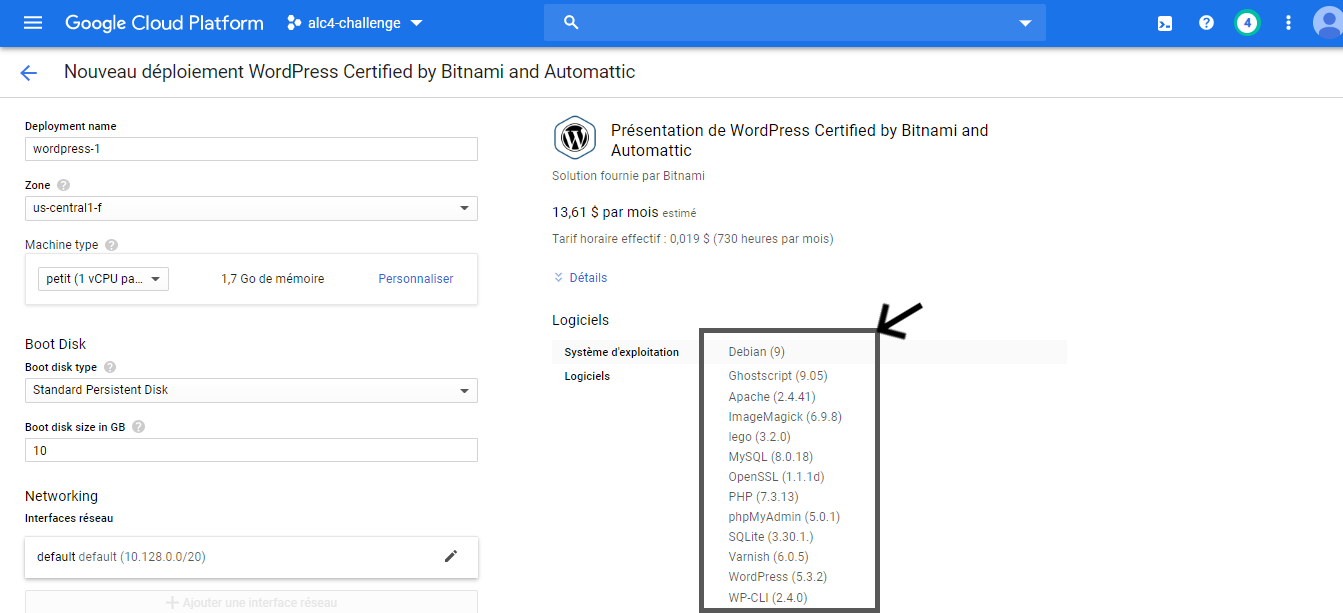
You have the possibility to modify the characteristics of the virtual machine which will execute your wordpress. In the gray frame, you have the operating system and the software that will be installed on it. 👇🏽
GCP Deployment Manager — WordPress Certified by Bitnami and Automattic
**_Why this one?_**
This is the one I use personally. It is complete, secure and always up to date.
Now that we have completed the installation, we will access the wordpress dashboard, files, database and phpmyadmin.
**_Access the wordpress dashboard._**
GCP Deployment Manager — WordPress Certified by Bitnami and Automattic
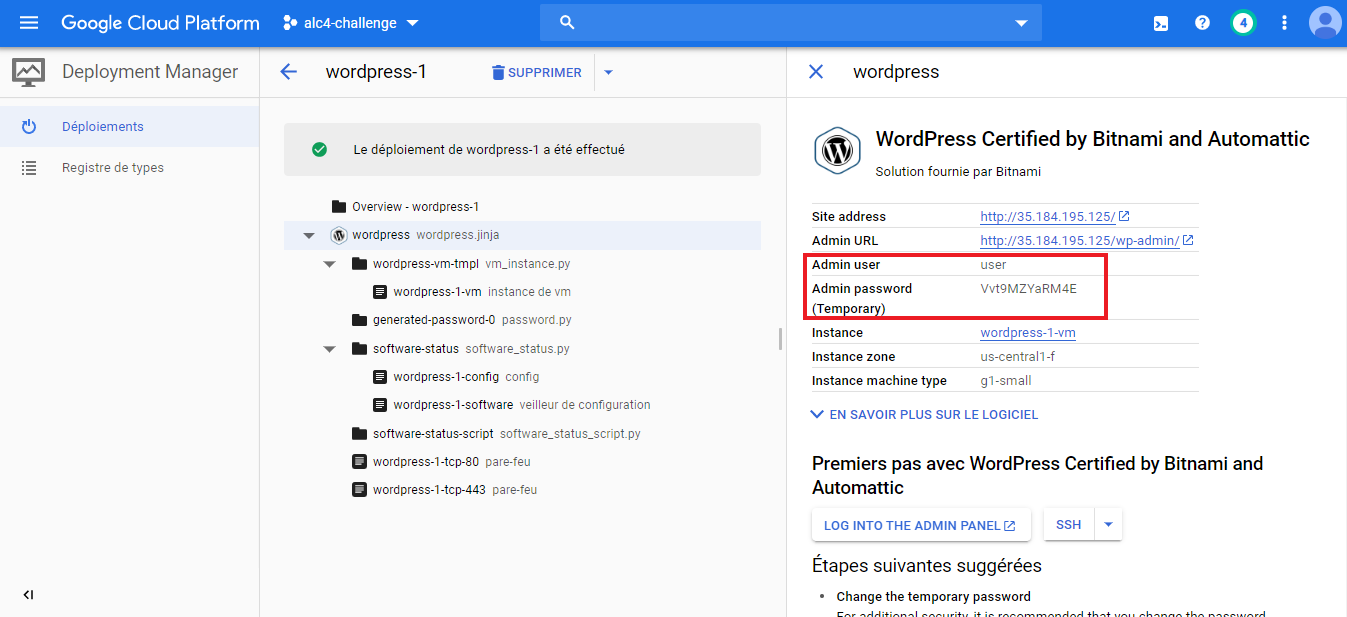
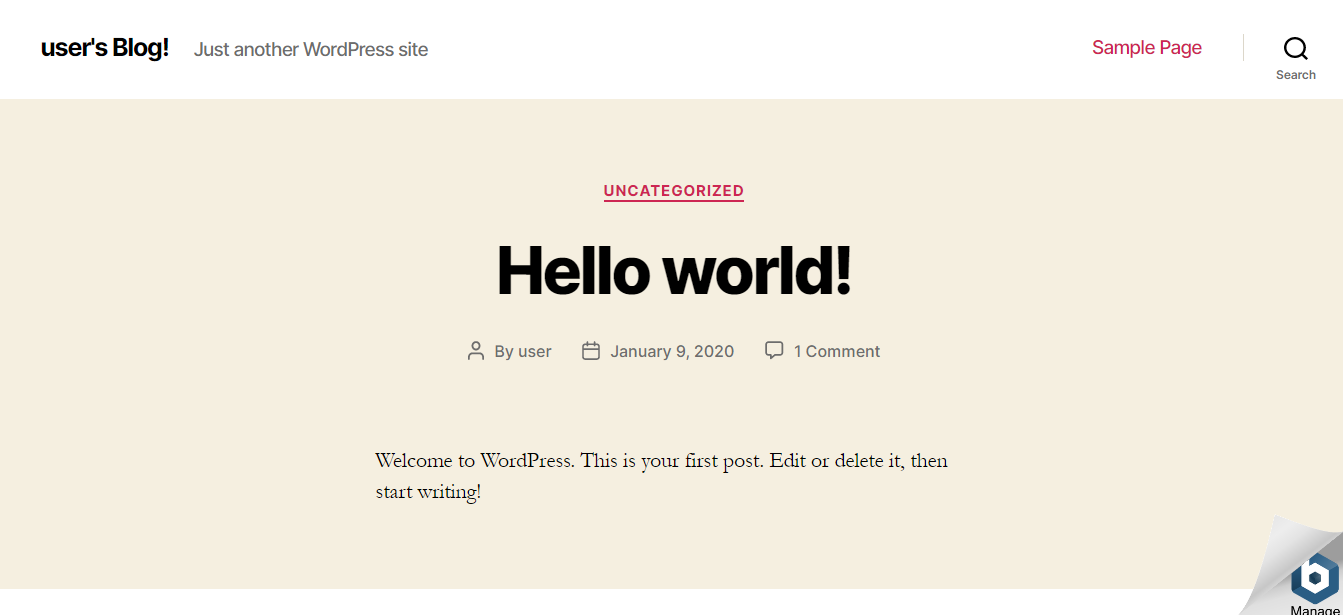
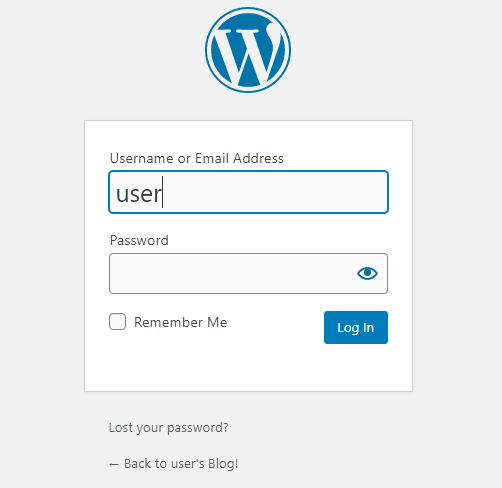
Click on the website address and admin url. To log in to admin mode on wordpress, use the identifiers framed in red☝🏽.
Wordpress page!
Wordpress admin page
**_Access files._**
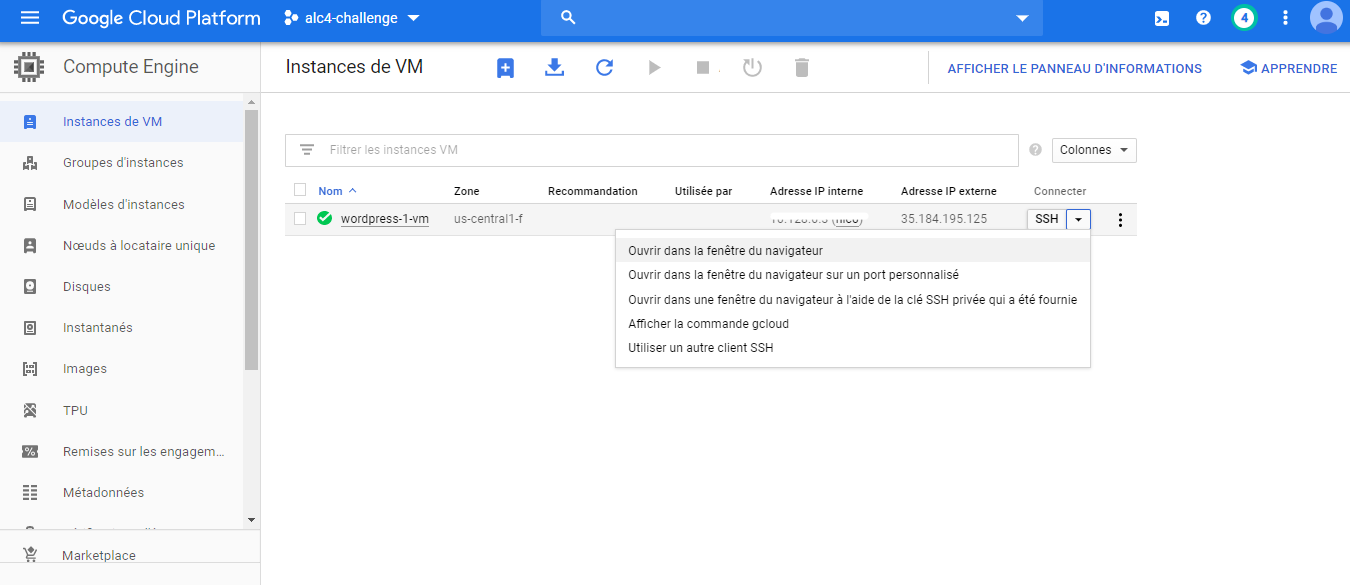
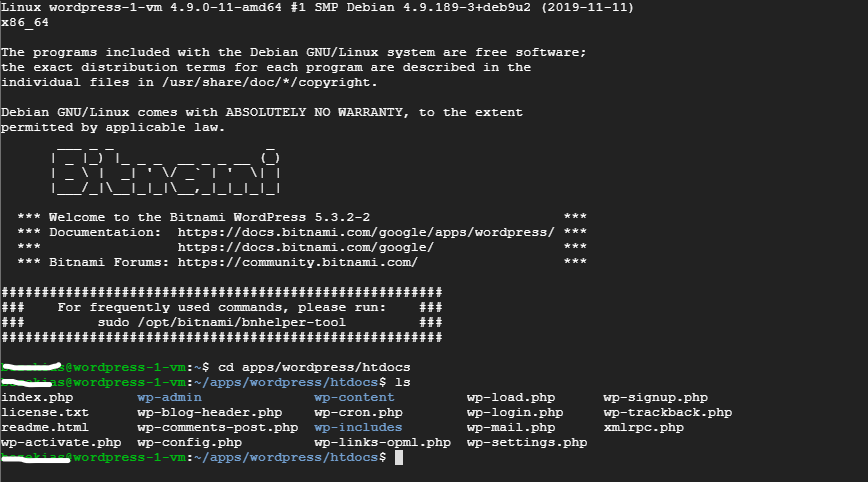
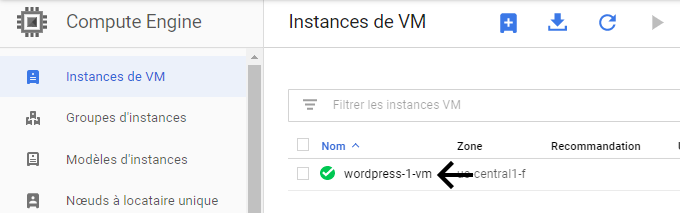
To get started, click on the instance name to access the Google Compute Engine page. After that, click on “**SSH**” then on “**Open in a browser window**” to connect to the virtual machine (VM).
Google Compute Engine — SSH
When you have access to the machine, type this command: **cd apps/wordpress/htdocs && ls**
**_SSH_**
**_Connect to the database._**
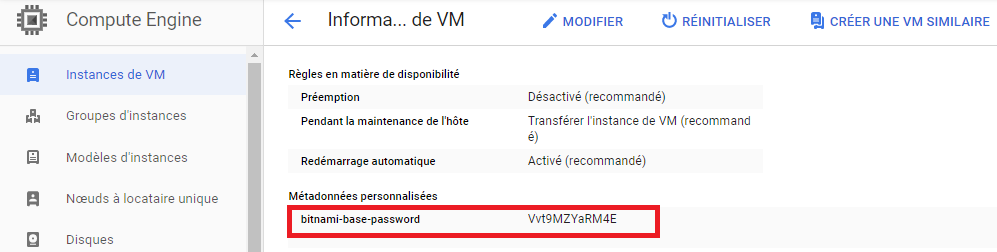
We will need the database code found in the virtual machine information. To access it, follow the following steps: 👇🏽
GCE VM!
bitnami-base-password
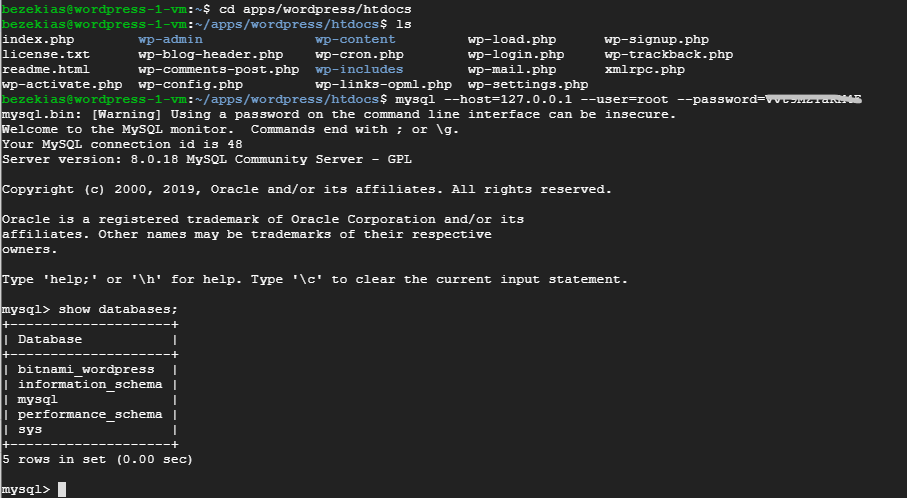
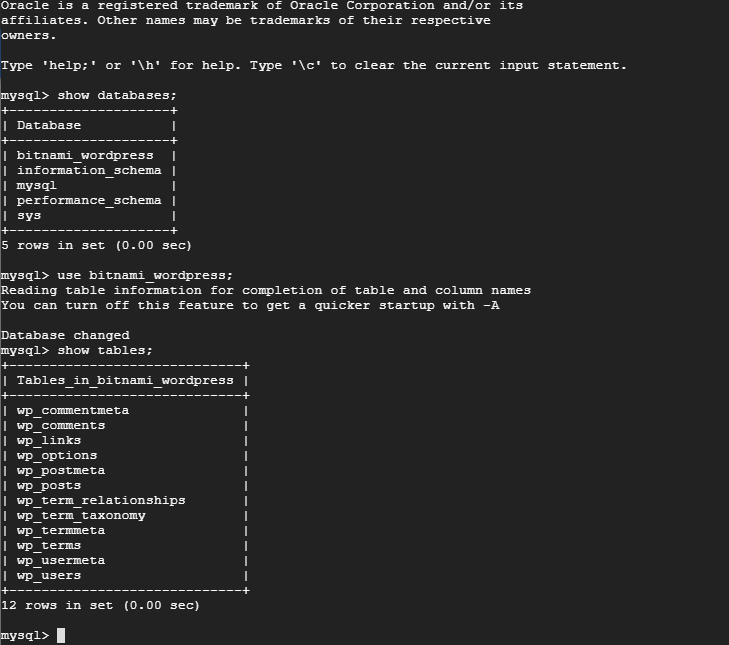
Look for “**bitnami-base-password**” in the VM information. Then run this command: **mysql — host=127.0.0.1 — user=root — password=“bitnami-base-password”**
**Access phpmyadmin.**
[https://docs.bitnami.com/google/faq/get-started/access-phpmyadmin/](https://docs.bitnami.com/google/faq/get-started/access-phpmyadmin/)
**Add a domain name to our website.**
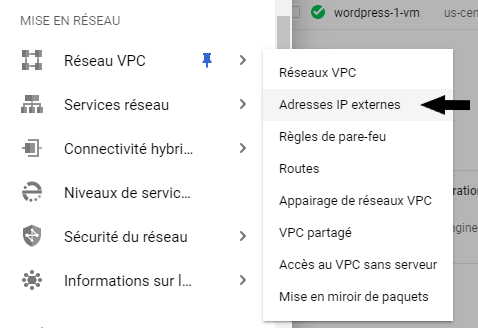
To begin with, we will make the IP address of our instance static. To do this, we will go to **VPC Network** and select **External IP Addresses** as Soot.👇🏽
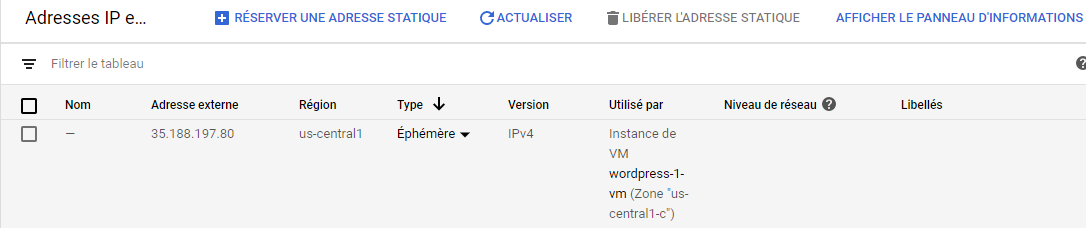
Once this is done, click on the type that is **“ephemeral”** by default and replace it with **“static”**.
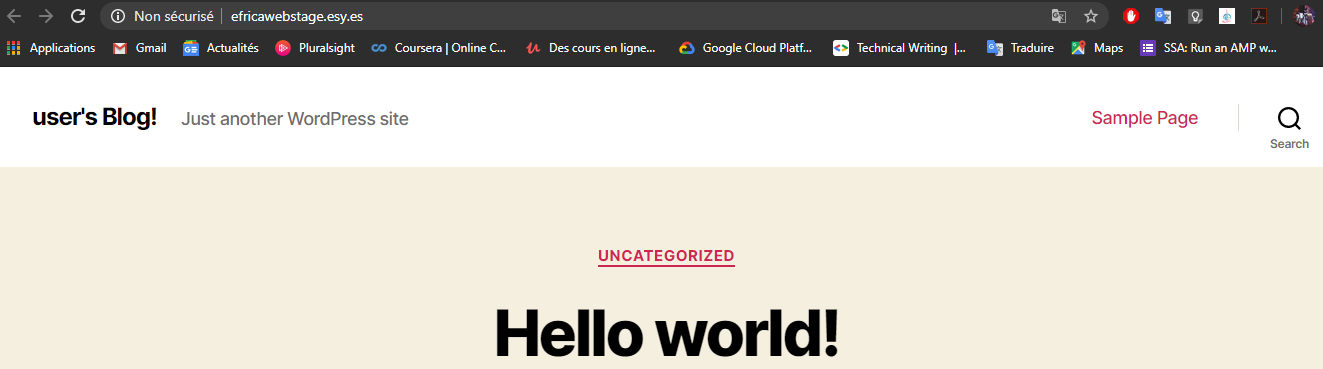
After you have done this, you need to update the DNS settings of your domain, adding an A record that points to the static IP address of your instance. That’s it, our website now has a domain name 👇🏽.
**Enable SSL Certificate.**
We will connect to our SSH instance once again. Then we’re going to run the command : **sudo /opt/bitnami/bnhelper-tool**
Now select “**Set up Let’s Encrypt**”. After that, write your domain name(s).
Finally, you will have a series of questions that you will answer.
- Enable HTTP to HTTPS redirection [Y/n]: Y
- Enable non-www to www redirection [Y/n]: Y
- Enable www to non-www redirection [y/N]: N
- Do you agree to these changes? [Y/n]: Y
- Do you agree to the Let’s Encrypt Subscriber Agreement? [Y/n]: Y
- Press [Enter] to continue:
As far as redirection issues are concerned, it all depends on what you want.
That’s it, our website is now secure.
And here we are, we just deployed wordpress on **Google Compute Engine** with a “**Marketplace**” solution.
Putting these eggs in one basket has never been a good idea. Reason why you should not put your database on the server that contains the files for your website. To solve this problem, you must put your database on Cloud SQL. And that’s what we’ll see in the next article.
Thank you for reading.
 GCP Marketplace!
 GCP Marketplace — WordPress Certified by Bitnami and Automattic
Take care to choose the one with the following name: “**WordPress Certified by Bitnami and Automattic**”.
GCP Marketplace — WordPress Certified by Bitnami and Automattic
Take care to choose the one with the following name: “**WordPress Certified by Bitnami and Automattic**”.
 WordPress Certified by Bitnami and Automattic
You have the possibility to modify the characteristics of the virtual machine which will execute your wordpress. In the gray frame, you have the operating system and the software that will be installed on it. 👇🏽
WordPress Certified by Bitnami and Automattic
You have the possibility to modify the characteristics of the virtual machine which will execute your wordpress. In the gray frame, you have the operating system and the software that will be installed on it. 👇🏽
 GCP Deployment Manager — WordPress Certified by Bitnami and Automattic
**_Why this one?_**
This is the one I use personally. It is complete, secure and always up to date.
Now that we have completed the installation, we will access the wordpress dashboard, files, database and phpmyadmin.
**_Access the wordpress dashboard._**
GCP Deployment Manager — WordPress Certified by Bitnami and Automattic
**_Why this one?_**
This is the one I use personally. It is complete, secure and always up to date.
Now that we have completed the installation, we will access the wordpress dashboard, files, database and phpmyadmin.
**_Access the wordpress dashboard._**
 GCP Deployment Manager — WordPress Certified by Bitnami and Automattic
Click on the website address and admin url. To log in to admin mode on wordpress, use the identifiers framed in red☝🏽.
GCP Deployment Manager — WordPress Certified by Bitnami and Automattic
Click on the website address and admin url. To log in to admin mode on wordpress, use the identifiers framed in red☝🏽.
 Wordpress page!
 Wordpress admin page
**_Access files._**
To get started, click on the instance name to access the Google Compute Engine page. After that, click on “**SSH**” then on “**Open in a browser window**” to connect to the virtual machine (VM).
Wordpress admin page
**_Access files._**
To get started, click on the instance name to access the Google Compute Engine page. After that, click on “**SSH**” then on “**Open in a browser window**” to connect to the virtual machine (VM).
 Google Compute Engine — SSH
When you have access to the machine, type this command: **cd apps/wordpress/htdocs && ls**
Google Compute Engine — SSH
When you have access to the machine, type this command: **cd apps/wordpress/htdocs && ls**
 **_SSH_**
**_Connect to the database._**
We will need the database code found in the virtual machine information. To access it, follow the following steps: 👇🏽
**_SSH_**
**_Connect to the database._**
We will need the database code found in the virtual machine information. To access it, follow the following steps: 👇🏽
 GCE VM!
 bitnami-base-password
Look for “**bitnami-base-password**” in the VM information. Then run this command: **mysql — host=127.0.0.1 — user=root — password=“bitnami-base-password”**
bitnami-base-password
Look for “**bitnami-base-password**” in the VM information. Then run this command: **mysql — host=127.0.0.1 — user=root — password=“bitnami-base-password”**
 **Access phpmyadmin.**
[https://docs.bitnami.com/google/faq/get-started/access-phpmyadmin/](https://docs.bitnami.com/google/faq/get-started/access-phpmyadmin/)
**Add a domain name to our website.**
To begin with, we will make the IP address of our instance static. To do this, we will go to **VPC Network** and select **External IP Addresses** as Soot.👇🏽
**Access phpmyadmin.**
[https://docs.bitnami.com/google/faq/get-started/access-phpmyadmin/](https://docs.bitnami.com/google/faq/get-started/access-phpmyadmin/)
**Add a domain name to our website.**
To begin with, we will make the IP address of our instance static. To do this, we will go to **VPC Network** and select **External IP Addresses** as Soot.👇🏽
 Once this is done, click on the type that is **“ephemeral”** by default and replace it with **“static”**.
 After you have done this, you need to update the DNS settings of your domain, adding an A record that points to the static IP address of your instance. That’s it, our website now has a domain name 👇🏽.
 **Enable SSL Certificate.**
We will connect to our SSH instance once again. Then we’re going to run the command : **sudo /opt/bitnami/bnhelper-tool**
**Enable SSL Certificate.**
We will connect to our SSH instance once again. Then we’re going to run the command : **sudo /opt/bitnami/bnhelper-tool**
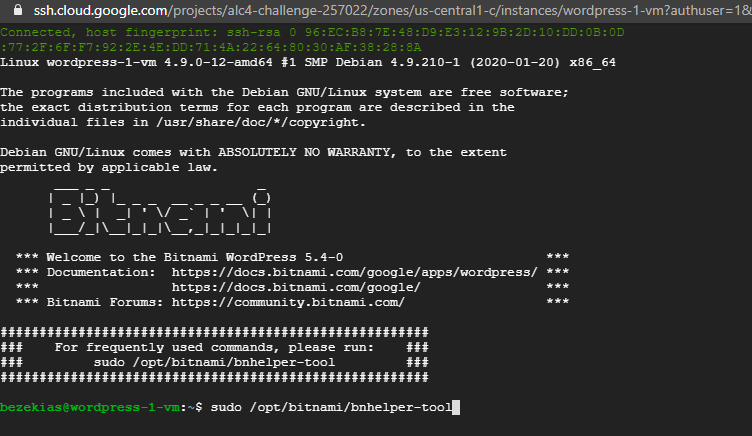
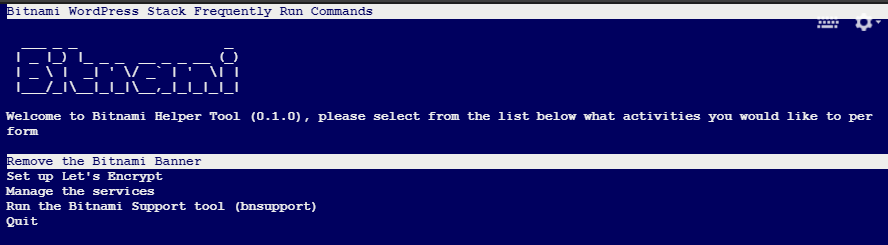 Now select “**Set up Let’s Encrypt**”. After that, write your domain name(s).
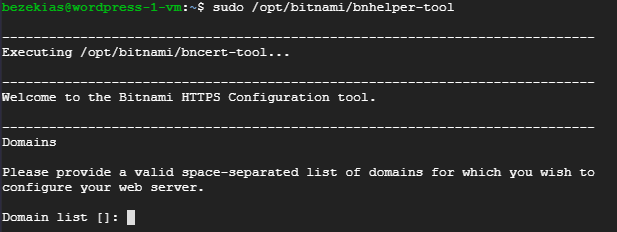 Finally, you will have a series of questions that you will answer.
- Enable HTTP to HTTPS redirection [Y/n]: Y
- Enable non-www to www redirection [Y/n]: Y
- Enable www to non-www redirection [y/N]: N
- Do you agree to these changes? [Y/n]: Y
- Do you agree to the Let’s Encrypt Subscriber Agreement? [Y/n]: Y
- Press [Enter] to continue:
As far as redirection issues are concerned, it all depends on what you want.
Finally, you will have a series of questions that you will answer.
- Enable HTTP to HTTPS redirection [Y/n]: Y
- Enable non-www to www redirection [Y/n]: Y
- Enable www to non-www redirection [y/N]: N
- Do you agree to these changes? [Y/n]: Y
- Do you agree to the Let’s Encrypt Subscriber Agreement? [Y/n]: Y
- Press [Enter] to continue:
As far as redirection issues are concerned, it all depends on what you want.
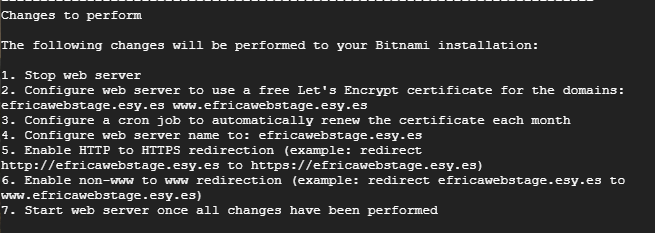 That’s it, our website is now secure.
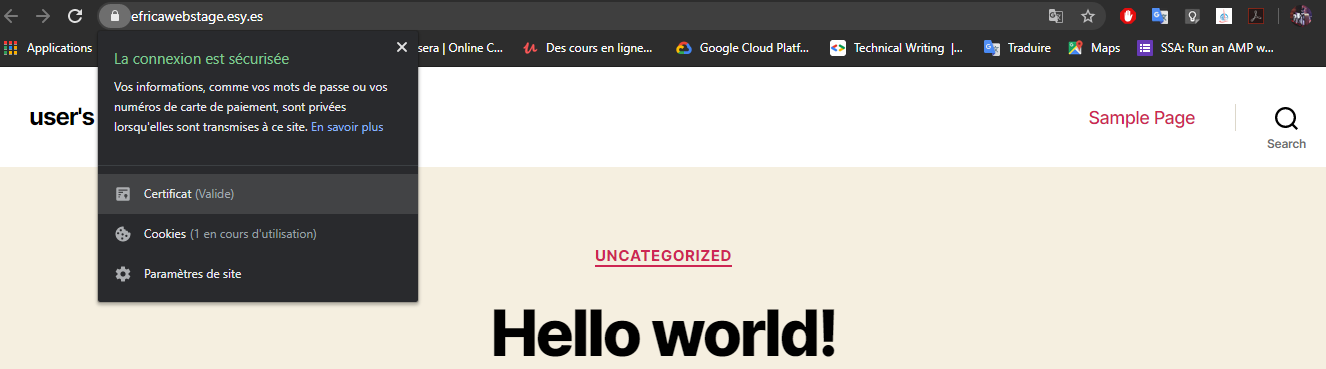 And here we are, we just deployed wordpress on **Google Compute Engine** with a “**Marketplace**” solution.
Putting these eggs in one basket has never been a good idea. Reason why you should not put your database on the server that contains the files for your website. To solve this problem, you must put your database on Cloud SQL. And that’s what we’ll see in the next article.
Thank you for reading.
And here we are, we just deployed wordpress on **Google Compute Engine** with a “**Marketplace**” solution.
Putting these eggs in one basket has never been a good idea. Reason why you should not put your database on the server that contains the files for your website. To solve this problem, you must put your database on Cloud SQL. And that’s what we’ll see in the next article.
Thank you for reading.